TDD 測試驅動開發 (Test-driven development),是一種先寫測試再寫產品程式碼的開發方式。先寫測試有助於先想清楚需求是什麼。
TDD 的步驟紅燈、綠燈、重構循環:
- 紅燈:撰寫失敗的測試案例。
- 綠燈:快速實作功能讓測試案例通過。
- 重構:在不改變功能的前提下,修改程式碼來改善可維護性。
這裡我們要以之前介紹的註冊會員API範例來用TDD的方式開發,開始之前請先參考這篇單元測試及範例的需求說明:
https://evanchen76.medium.com/spring-boot-單元測試-795a41176a40
範例Github連結:
Controller
為什麼從 Controller 開始?
從需求來看,我們需要一個 API 來接收請求並回應。當有了這個 API 需求,如果其中包含業務邏輯就需要 Service,如果需要資料儲存就需要 Repository。因此,我們應該從需求出發,依序開發對應的元件。本案例從 Controller 開始開發是因為我們的第一個需求是處理 API 請求。
Controller 層的職責:
- 帳號密碼欄位的基本檢查
- 呼叫Service註冊
- 回應Service建立帳號的結果
請開啟SpringTDDSample,可對照裡面的commit。
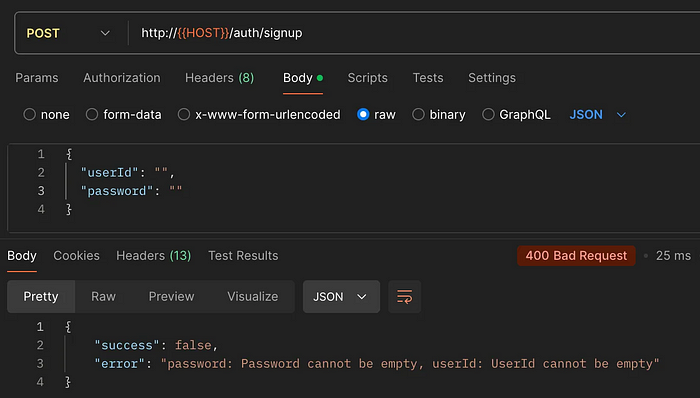
測試案例 1:輸入驗證失敗
預期行為
Request
{
    "userId": "",
    "password": ""
}
Response
HTTP Status: 400 Bad Request
{
    "success": false,
    "error": "password: Password cannot be empty, userId: UserId cannot be empty"
}
測試重點:
- 使用帳號密碼為空字串建立請求
- 驗證 HTTP 狀態碼為 400 Bad Request
- 驗證回應中的success為false
- 驗證回應中包含錯誤訊息
實作步驟
首先建立AuthControllerTest
@WebMvcTest(AuthController.class)
@Import(SecurityConfig.class)
public class AuthControllerTest {
    @Autowired
    private MockMvc mockMvc;
    @Autowired
    private ObjectMapper objectMapper;

    @Test
    void signup_WhenAllFieldsEmpty_ShouldFailValidation() throws Exception {

    }
}
接著建立 SignupRequest。在 IDE 中可以使用 Option + Enter 快捷鍵,選擇 Create record ‘SignupRequest’ 自動生成:

Target destination directory 記得改到main

就可以看到產生SignupRequest
public record SignupRequest() {
}
再回到AuthControllerTest
一樣Option + Enter:Change signature of SignupRequest 就可以產生兩個欄位。

public record SignupRequest(String userId, String password) {
}
接著使用mockMvc來呼叫auth/signup,並驗證結果。
@WebMvcTest(AuthController.class)
@Import(SecurityConfig.class)
class AuthControllerTest {

@Autowired
    private MockMvc mockMvc;
    @Autowired
    private ObjectMapper objectMapper;
    @Test
    void signup_WhenAllFieldsEmpty_ShouldFailValidation() throws Exception {
        SignupRequest request = new SignupRequest("", "");
        mockMvc.perform(post("/auth/signup")
                        .contentType(MediaType.APPLICATION_JSON)
                        .content(objectMapper.writeValueAsString(request)))
                .andExpect(status().isBadRequest())
                .andExpect(jsonPath("$.success").value(false))
                .andExpect(jsonPath("$.error").exists());
    }
}
執行測試獲得第一個紅燈(測試失敗),這是正常的,因為我們還沒有實作 Controller。
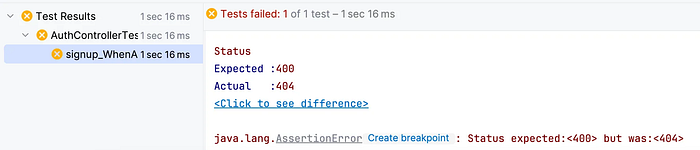
Status
Expected :400
Actual   :404
接著新增AuthController,完成signup的檢核邏輯。
@RestController
@RequestMapping("/auth")
public class AuthController {
    @PostMapping("/signup")
    public ApiResponse<SignupResponse> signup(@Valid @RequestBody SignupRequest request) {
        throw new UnsupportedOperationException("Not implemented yet");
    }
}

public record SignupResponse() {}
在上Request加上@NotBlank
public record SignupRequest(
        @NotBlank(message = "UserId cannot be empty")
        String userId,
        @NotBlank(message = "Password cannot be empty")
        String password) {
}
再重新執行測試後通過測試。
測試案例 2:註冊成功
這個測試案例驗證透過 Service 註冊成功時,Controller 是否正確返回成功回應。
Request
{
    "userId": "EvanChen",
    "password": "password01"
}
Response
{
    "success": true,
    "data": {
        "uuid": "c261758b-b1f0-4998-812a-14c601e4d71d",
        "userId": "EvanChen"
    }
}
測試重點
- 使用可通過驗證的userId與password
- Mock Service 層返回成功結果
- 驗證回應內容
在這個測試案例,Service出現了,我們要開始處理 Service回應註冊成功時,Controller應該怎麼回應。
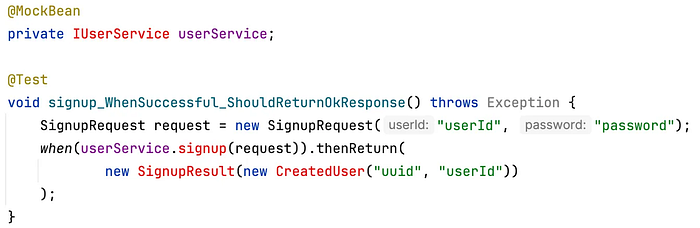
首先新增測試案例,SignupRequest使用正常的帳號密碼,接著需要模擬Service 的回應。接著在這些紅字上面,Option + Enter 依序產生IUserService這個Interface及其方法。
完成後如下:
@WebMvcTest(AuthController.class)
@Import(SecurityConfig.class)
class AuthControllerTest {

@MockBean
    private IUserService userService;

  @Test
  void signup_WhenSuccessful_ShouldReturnOkResponse() throws Exception {
     SignupRequest request = new SignupRequest("userId", "password");
     when(userService.signup(request)).thenReturn(
            new SignupResult(new CreatedUser("uuid", "userId"))
     );
  }
}
public interface IUserService {
    CreatedUser signup(SignupRequest request);
}
@Service
public class UserService implements IUserService {
    @Override
    public CreatedUser signup(SignupRequest request) {
        throw new UnsupportedOperationException("Not supported yet.");
    }
}
public record CreatedUser(String uuid, String userId) { }
這邊要注意雖然我們建立了Service。但還沒有要實作Service。我們目前仍在處理Controller,只是需要模擬Service的行為。所以這裡可以使用 throw new UnsupportedOperationException(“Not supported yet.”); 來表示未實作。不要回傳null或暫時的CreateUser物件。
@Service
public class UserService implements IUserService {
    @Override
    public CreatedUser signup(SignupRequest request) {
        throw new UnsupportedOperationException("Not supported yet.");
    }
}
接著用mockMvc 模擬API請求及驗證結果
@Test
void signup_WhenSuccessful_ShouldReturnOkResponse() throws Exception {
SignupRequest request = new SignupRequest("userId", "password");
when(userService.signup(request)).thenReturn(
new SignupResult(new CreatedUser("uuid", "userId"))
);
mockMvc.perform(post("/auth/signup")
.contentType(MediaType.APPLICATION_JSON)
.content(objectMapper.writeValueAsString(request)))
.andExpect(status().isOk())
.andExpect(jsonPath("$.success").value(true))
.andExpect(jsonPath("$.data.uuid").value("uuid"))
.andExpect(jsonPath("$.data.userId").value("userId"));
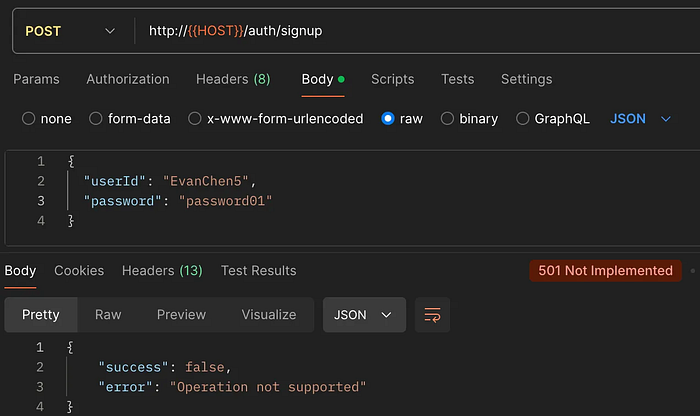
}執行測試失敗(紅燈)。
Status
Expected :200
Actual   :501
這裡會是501是因為我們在signup是寫UnsupportedOperationException,所以GlobalException也要記得變處理UnsupportedOperationException為501。這跟一般500要區分,就是這個紅燈雖然要失敗,但也不能是500的錯誤,因為500代表你有地方沒處理好,用501來表示未實作。
實作AuthController
要通過這個測試,需要在AuthController開始處理Service,所以我們加上注入UserService,並呼叫userService.signup。接著執行測試,通過測試。
@RestController
@RequestMapping("/auth")
public class AuthController {

private final IUserService userService;
    public AuthController(IUserService userService) {
        this.userService = userService;
    }
    @PostMapping("/signup")
    public ApiResponse<SignupResponse> signup(@Valid @RequestBody SignupRequest request) {
        var signupResult = userService.signup(request);
        var uuid = signupResult.createdUser().uuid();
        var userId = signupResult.createdUser().userId();
        return ApiResponse.success(new SignupResponse(uuid, userId));
    }
}

public record SignupResponse(String uuid, String userId) {
}
在通過測試後,記得在git commit,如果有錯,我們可以快速的回到上一個版本。
重構
TDD的第3步驗:重構,在第二步驟通過測試時。用最快速簡單的方式來通過測試。接著在測試保護的情況下進行重構。
用重構工具 Refactor → Introduce Constant,將 userId與password重構提出為常數。
@Test
void signup_WhenSuccessful_ShouldReturnOkResponse() throws Exception {
    SignupRequest request = new SignupRequest("userId", "password");
    ...
}
重構完再重新測試一次
public class AuthControllerTest {
public static final String USER_ID = "userId";
    public static final String PASSWORD = "password";

    @Test
    void signup_WhenSuccessful_ShouldReturnOkResponse() throws Exception {
        SignupRequest request = new SignupRequest(USER_ID, PASSWORD);
    }
}
接著再Commit。
測試案例 3:註冊失敗
這個測試驗證當 Service 層返回驗證錯誤時,Controller 是否正確處理失敗情況。
新增測試案例:
@Test
void signup_WhenServiceReturnsFails_ShouldReturnBadRequest() throws Exception {
    SignupRequest request = new SignupRequest(USER_ID, PASSWORD);
    List<String> validationErrors = List.of("error1", "error2");
    when(userService.signup(request)).thenReturn(
            new SignupResult(null, validationErrors)
    );
    mockMvc.perform(post("/auth/signup")
                    .contentType(MediaType.APPLICATION_JSON)
                    .content(objectMapper.writeValueAsString(request)))
            .andExpect(status().isBadRequest())
            .andExpect(jsonPath("$.success").value(false))
            .andExpect(jsonPath("$.error").value(validationErrors.toString()));
}
在這個案例,Controller要處理Service所回傳的錯誤訊息,也就是SignupResult這個類別,需要增加錯誤訊息。在new SignupResult 初始化直接加上一個預期的錯誤訊息。
同樣在紅字上按 Option + Enter 就可以插入新的欄位。

另外我們加一個isSuccess來判斷是否成功。
public record SignupResult(CreatedUser createdUser, List<String> error) {
	 public boolean isSuccess() {
        return error == null || error.isEmpty();
    }
}
原本的signup也要修改一下判斷isSuccess才回傳。在isSuccess=false時,我們先不處理,先加上throw new UnsupportedOperationException(“Not supported yet.”);。
@PostMapping("/signup")
public ApiResponse<SignupResponse> signup(@Valid @RequestBody SignupRequest request) {
    var signupResult = userService.signup(request);
    if (signupResult.isSuccess()) {
        var uuid = signupResult.createdUser().uuid();
        var userId = signupResult.createdUser().userId();
        return ApiResponse.success(new SignupResponse(uuid, userId));
    }else{
		    //先不要處理,先產生一個紅色
        throw new UnsupportedOperationException("Not supported yet.");
    }
}
執行測試失敗(紅燈)。這邊記得所以的測試記得都要執行,因為改了signup 有可能會改壞之前的。
實作AuthController
在AuthController,原本的UnsupportedOperationException 改成 Controller補上error處理
if (signUpResult.isSuccess()) {
        ...
    }else{
        return ApiResponse.fail(HttpStatus.BAD_REQUEST, signUpResult.error().toString());
    }
再執行測試就通過。這樣就透過TDD完成Controller了。這樣我們就完成Controller。如果這時候執行應用程式。在postman測試,輸入帳號錯誤的已經可以正常運作。
而輸入正常的的帳號密碼會是501,因為我們Service還沒實作。
下一篇接著介紹Service